codedecoder

breaking into the unknown…


Leave a comment

custom file uploader

In this post we will discuss input type = “file” and learn to style it in our own way. This input filed is displayed as a text_filed followed by browse button. The html markup for a File Uploader is as below.

<input id="loan_attachments_file" type="file" name="loan[attachments][file]" />

The problem, with this default approach is that it is rendered by different browser in different way.
For example : this is how it looks in Mozilla and Chrome .

File Uploader display in chrome

NOTE : the complete HTML structure for the images below is given in step 4 towards the end

file_uploader_chrome

file_uploader_chrome

File Uploader display in Firefox.

firefox_file_uploader

firefox_file_uploader

So, you can see that the look and feel of uploader is different in different browser. We will now customize the uploader, with our own css, so that it look consistent in all the browser. We will follow the below approach.

STEP 1: Hide the default File Uploader

<input type="file" style="display:none;" name="loan[attachments][file]" 
id="loan_attachments_file" />

STEP 2: Create HTML structure similar to default one

create a text field followed by browse button or link. Obviously, you can apply any css look to the text-filed or the browse button.

I have used below HTML structure. showing only the customized uploader code

<div>
  <div>
    <input type="text" value="Please select a file" id="filename" />
    <label id="upload_doc_label" for="loan_attachments_file">Browse</label>
    <input type="file" style="display:none;" name="loan[attachments][file]" id="loan_attachments_file" />
  </div>
</div>

So here we have provided our own custom uploader and hidden the default uploader. But I have found that, in IE8 clicking on the browse label do not trigger the default file input we have marked as hidden as IE8 do not recognize element with display:none . since, our aim is to do not show the default file uploader, we can achieve it with setting its absolute position outside the view. The correct markup working in all IE version and browser is as below.

<div>
  <div>
    <input type="text" value="Please select a file" id="filename" />
    <label id="upload_doc_label" for="loan_attachments_file">Browse</label>
      <input type="file" style="display:none;" name="loan[attachments][file]" id="loan_attachments_file" 
      style= "-moz-opacity:0;filter:alpha(opacity:0);opacity:0; position:absolute; top:-50px"/>
  </div>
</div>

It look as below in all the browser

customized_file_uploader

customized_file_uploader

STEP 3: Trigger click event on the hidden file input

Here You should remember that, the default file input type do below two things.

=> on clicking browse button open up file navigation window for selecting file

=>on selecting a file, it populate the text filed with path of the selected file

Now, we will control these two aspect, with JavaScript code .

=> when user click custom browse button, we will trigger click event on the hidden field input

    if($.browser.mozilla) {
        $( "#upload_doc_label" ).on( "click", function(e) {
            e.preventDefault();
            $('#loan_attachments_file').trigger('click');
        });
    }

Here come the tricky part. You can see that, I have triggered the click event only when browser is mozilla. This is because, mozilla do not support for tag on lable while chrome and IE support it. Since we have made the browse button as label, whose for attribute have id of the hidden file type, when ever user click the browse lable, the hidden file input field automatically get selected and click event get fired on it. This do not happen in case of mozila, so we have explicitly triggered it.

Now, the question arise what is wrong if we allow it for IE and chrome also. Well if you do that, you have to search in google “Custom File Uploader not working in IE” . I mean the uploader not at all work in IE , though it will work in chrome and Firefox . The issue is discussed in depth here on the stackoverflow.

NOTE : browse button is designed as lable so that IE trigger click event on the file input itself rather then explicitly through the code.

=> Populate the custom text field with the file path of the selected file.

    $( "#loan_attachments_file" ).on( "change", function(e) {
        var temp = $(this).val().split('\\').length;
        var filename = $(this).val().split('\\')[temp - 1];
        $('#filename').val(filename);
    });

STEP 4 : click the upload button to upload the file

Below is the code having file field within a form with a upload and a cancel button

<form method="post" id="edit_loan_349" enctype="multipart/form-data" action="/loan_documents">
  <div>
    <div>
      <input type="text" value="Please select a file" id="filename" />
      <label id="upload_doc_label" for="loan_attachments_file">Browse</label>
    </div>
  </div>
  <input type="file" style="display:none;" name="loan[attachments][file]" id="loan_attachments_file"  
  style= "-moz-opacity:0;filter:alpha(opacity:0);opacity:0; position:absolute; top:-50px"/>
  <div>
    <div>
      <input type="submit" value="Upload" name="commit" id="upload_doc" />
      <a href="/loan_documents/document_listing">Cancel</a>
    </div>
  </div>
</form>


Leave a comment

require_tree require_self in asset_pipeline

Assets Pipeline introduced with rails 3, combines all the js file into one application.js file and all css files into one application.css file.

=> Understanding application.js and application.css in rails

application.js and application.css are manifest file in rails . A manifest file is a file which simply enumerates the files which are included in the distribution, either for processing by various packaging tools, or for human consumption.

When you create a new rails 3 application, you will find app/assets folder containing javascript, stylesheet and images folder within it.

within stylesheet folder you will find application.css file with below content

/*
 * This is a manifest file that'll be compiled into application.css, which will include all the files
 * listed below.
 *
 * Any CSS and SCSS file within this directory, lib/assets/stylesheets, vendor/assets/stylesheets,
 * or vendor/assets/stylesheets of plugins, if any, can be referenced here using a relative path.
 *
 * You're free to add application-wide styles to this file and they'll appear at the top of the
 * compiled file, but it's generally better to create a new file per style scope.
 *= require_self
 *= require_tree .
 */

Similarly, you can find application.js file in javascript folder with the below content

// This is a manifest file that'll be compiled into application.js, which will include all the files
// listed below.
//
// Any JavaScript/Coffee file within this directory, lib/assets/javascripts, vendor/assets/javascripts,
// or vendor/assets/javascripts of plugins, if any, can be referenced here using a relative path.
//
// It's not advisable to add code directly here, but if you do, it'll appear at the bottom of the
// the compiled file.
//
// WARNING: THE FIRST BLANK LINE MARKS THE END OF WHAT'S TO BE PROCESSED, ANY BLANK LINE SHOULD
// GO AFTER THE REQUIRES BELOW.
//
//= require jquery
//= require jquery_ujs
//= require_tree .

So, We will try to figure out the term require require_self and require_tree .

require is like usual ruby require which make a file accessible within the file it is called. The file path will be relative and will be searched in path : lib/assets/javascripts, vendor/assets/javascripts, or vendor/assets/javascripts for javascript and lib/assets/stylesheet, vendor/assets/stylesheet, or vendor/assets/stylesheet for stylesheet . Further you do not need to provide extension of the file as it assume stylesheet will contain .css files and javascript will contain .js file. Anyway, it will not complain if you provide the extension also .

require_self tell the asset pipeline to include the file within which it is used i,e here it is telling the asset pipeline to include application.css file also while precompiling the css assets . It means if you write any css within application.css (avoid it , it is against convention) that will also get reflected.basically, since we are not writing any css within application.css, removing require_self will not make any difference.

require_tree will tell asset pipeline to include all the files within the specified directory. By default it is set to current directory with . (i,e dot) . So say you have bootstrap.min.css and bootstrap_responsive.min.css file in app/assets/stylesheet folder, then the require_tree . will automatically load them. Now say you have put your all custom css file in app/assets/custom_css folder, then you can load them by writing another require_tree as below

 *= require_self
 *= require_tree .
 *= require_tree ../custom_css

So first require_tree will load all css from current directory i,e stylesheet folder and second one will from custom_css folder.

NOTE : require_tree load all the file from the specified directory, but in random order, mostly in alphabetically order. Be careful ,  as css and js files are dependent on the order in which they are called

=> Loading css or js file in specific order
Js files are dependent on the order in which they are called. For example let you have jquery.min.js , bootstrap.min.js ,

bootstrap_responsive.min.js and custom.js file in app/assets/javascript folder. But say in application.js you write

//= require_tree .

It will load all the above files for you, but not in desired order. So for the file which need in order use require, as then they will be called in the order they are called. So below is the correct way of specifying the file.

 //= require jquery.min.js 
 //= require bootstrap.min.js
 //= require bootstrap-responsive.js
 //= require_tree .

So, the file with require will be called in same order, and then all other file will be called. Also you may call require_tree at any position. See another example below of application.css from one of my application

 *= require jquery.loader-min
 *= require ui.jqgrid
 *= require_tree .
 *= require jquery-ui/dark-hive
 *= require themes/cyborg/css/bootstrap.min.css
 *= require themes/cyborg/css/bootstrap_and_overrides.css
 *= require_self

I have called, some files after require_tree , as those are files in vendor directory and I want them to be called, after all css file in current directory is loaded.

NOTE : require_tree do not include files which are already called by require . Further If you want you can call all the files with require and then you will not need require_tree.


REFERENCE :

http://guides.rubyonrails.org/asset_pipeline.html#manifest-files-and-directives


6 Comments

bootstrap drop down-menu not working with rails

Recently, a trainee learning bootstrap comes to me for help asking why the bootstrap drop down menu not working. It took me about 20 minutes to figure out the issue. As usual first I tried to see that the HTML structure or markup of menu  as required by Bootstrap dropdown .

The structure used by the trainee is as below and it look fine.

<div class="nav-collapse collapse">

   <ul class="nav pull-right">

      <li class="dropdown">

          <a href="/product_and_services" class="dropdown-toggle" data-toggle="dropdown">
                                     Products and Services<b class="caret"></b>
          </a>

          <ul class="dropdown-menu">

             <li class="nav-header">PRODUCTS</li>

             <li><a href="product.html">Product1</a></li>

             <li><a href="product.html">Product2</a></li>

             <li><a href="product.html">Product3</a></li>

             <li><a href="all_products.html">All products</a></li>

             <li class="divider"></li>

             <li class="nav-header">SERVICES</li>

             <li><a href="service.html">Service1</a></li>

            <li><a href="service.html">Service2</a></li>

            <li><a href="service.html">Service3</a></li>

            <li><a href="all_services.html">All services</a></li>

        </ul>

     </li>

     <li class="dropdown">

        <a href="/about" class="dropdown-toggle" data-toggle="dropdown">About<b class="caret"></b></a>

        <ul class="dropdown-menu">

           <li><a href="our_works.html">Our works</a></li>

           <li><a href="patnerships.html">Parnerships</a></li>

           <li><a href="leadership.html">Leadership</a></li>

           <li><a href="news.html">News</a></li>

           <li><a href="events.html">Events</a></li>

           <li><a href="blog.html">Blog</a></li>

        </ul>

     </li>

     <li><a href="faq.html">FAQ</a></li>

     <li><a href="/contact_us">Contact us</a></li>

     <li><a href="signup.html">Sign up</a></li>

     <li><a href="signin.html">Sign in</a></li>

   </ul>

</div>

So structure is O.K, with Product and Services, and About menu having sub menu within them. By default bootstrap behaviour,  when user click on these two menu the sub menu should appear. But it is not working.

let us try to trigger it manually on firebug console.

$('.dropdown-toggle').dropdown()
TypeError: $(...).dropdown is not a function

O.k show we now know the problem : the dropdown() function is not getting called

Now it may happen due to any of the below reason .

Reason 1: you forget to add bootstrap-dropdown.js file
This is possible if you are using individual js component of bootstrap rather than bootstrap.js or bootstrap.min.js.
but in our case we are using jquery.min.js file, so it is sure that all required js component is included.

Reason 2: jquery.js file is added after  the bootstrap file
the bootstrap.js file is dependent on jquery.js , so jquery.js file must be added before bootstrap.js file.
In rails you can define it in application.js file. My application.js file look like this

//= require jquery
//= require jquery_ujs
//= require_tree .

So here. we have included jquery at the top then jquery_ujs and then we have done require_tree . which will automatically include all the files within app/assets/javascript folder. Currently this folder contain application.js, bootstrap.min.js , jquery.min.js and custom.js file, so all of them will be included in the alphabetical order. the application.js file will be rendered in the end. You can see it by viewing page source. The js are rendered in below sequence as shown in the page source.

<script src="/assets/jquery.js?body=1" type="text/javascript"></script>
<script src="/assets/jquery_ujs.js?body=1" type="text/javascript"></script>
<script src="/assets/boot-business.js?body=1" type="text/javascript"></script>
<script src="/assets/bootstrap.min.js?body=1" type="text/javascript"></script>
<script src="/assets/custom.js?body=1" type="text/javascript"></script>
<script src="/assets/jquery.min.js?body=1" type="text/javascript"></script>
<script src="/assets/application.js?body=1" type="text/javascript"></script>

So we can see that jquery.js file is at the top, so this is also not the cause of our problem

Reason 3: jquery or bootstrap file is included more than once
So this is the cause of our problem. You can easily see from the above page source that jquery is included twice, one at the top as jquery.js and again at the second last line as jquery.min.js. Now why this happened . Actually,  //= require jquery line in application.js file load the jquery from jQuery-rails gem which is now shipped as default with rails 3. But the trainee, following the bootstrap tutorial also added jquery.min.js file in the app/assets/javascript folder, which get rendered by //= require_tree . directive.

=> Triggering bootstrap dropdown menu on hover

By default, bootstrap dropdown get triggered on click , but you can make it to open on hover by adding below code, I have added it to custom.js file

$(document).ready(function(){
    $('.navbar .dropdown').hover(function() {
        $(this).find('.dropdown-menu').first().stop(true, true).delay(250).slideDown();
    }, function() {
        $(this).find('.dropdown-menu').first().stop(true, true).delay(100).slideUp()
    });
})


Leave a comment

background-image url( ../img/glyphicons-halflings.png ) not found

Bootstrap, use two sprite image glyphicons-halflings.png and glyphicons-halflings-white.png to represent its various icon images. I have these two images in public folder of my app. The image loading properly in Development mode, But failed to load in production. If you do not want to read the detail below, skip to solution at the end

I inspected the icon path in Firebug, and see that both in Development and Production, the image path is generated as below

background-image: url(“../img/glyphicons-halflings.png”); # So, it mean, the image should be found by moving out of the folder which contain the css file, then going inside img folder.

I copied the location of the css file in Development and Production from firebug which look like as below

Development:

http://localhost:3000/assets/themes/cyborg/css/bootstrap.min.css?body=1

I have kept my bootstrap.min.css in vendor/assets/themes/cyborg/css folder.

Production:

http://barcelona-portal.thirdpillar.com/assets/application-62b40f21651cc1aee1a5ab5aed48f757.css

The difference is obvious i,e In production I have set assets compile to false, but is true by default in Development.

config.assets.compile = false # why to not set it to true in production is explained in detail here on stackoverflow.

In production, I use to compile the asset myself manually with below command

bundle exec rake assets:precompile RAILS_ENV=production

Now, what it do… It will precompile all the css file into one application.css file with attached fingerprint ( example: application-62b40f21651cc1aee1a5ab5aed48f757.css above ), all js into single application.js and precompile all images present anywhere in app/assets or vendor folder, and place them all in public/assets folder.

In production, with asset pipeline disable with config.assets.compile = false, assets can be only served from public and public/assets folder and never from app/assets folder. If you do not want any thing to precompiled with above command place it directly in public folder. All other thing in app/assets or vendor will be precompiled and placed in public/assets folder

So below is the Problem and Solution

Problem: Image loading in Development but not in Production

With asset pipeline enabled by default in Development(config.assets.compile = true), asset pipeline try to load any asset like image, css or js file from  public, app/assets and vendor folder of your application and give not found if not available anywhere. So in Development , it able to find the image finally from the public folder. But, in production, I have disabled the asset pipeline, So, it try to serve the asset from the public folder only and at the defined path.

I do have placed the two images in img folder outside the folder which contain my bootstrap.css file. See the path below

vendor/assets/themes/cyborg/css/bootstrap.min.css

vendor/assets/themes/cyborg/img/glyphicons-halflings.png

Now when I , precompiled the assets manually with below command

bundle exec rake assets:precompile RAILS_ENV=production

The css and image file are stored at below path

public/assets/application-62b40f21651cc1aee1a5ab5aed48f757.css

public/assets/glyphicons-halflings-5741d4c8c8da770477d66e6addf5dfec.png

But, url generated is background-image: url(“../img/glyphicons-halflings.png”) , if you make it  background-image: url(“glyphicons-halflings.png”) it will start working

Solution: Adding the image at correct path or modifying the path

solution 1:

url generated is background-image: url(“../img/glyphicons-halflings.png”) , So since application.css is at path public/assets/ , the correct path of image should be public/img/. Copy the two image in public/img/ and commit the file, restart the server, It will start working

NOTE : any file in public folder is not precompiled by asset pipeline. So if you want your file to be prcompiled, place it in app/assets or vendor and override the default path as in solution2

solution 2:

override the default path background-image: url(“../img/glyphicons-halflings.png”) in bootstrap_and_overrides.css file of icon as below

[class^=”icon-“],
[class*=” icon-“] {
background-image: url(“glyphicons-halflings.png”);
}
.icon-white {
background-image: url(“glyphicons-halflings-white.png”);
}


6 Comments

rails with bootstrap

Bootstrap is one of the most talked about project of twitter on github . It is a total html5 and css3 compliant solution for your UI . Basically, It is a kind of reverse engineering for a UI developer. Let me put up it in simple words. When a UI designer, design a site, he write css and keep adding on them as need arises . So he first write classes for managing overall layout, then for navigation, button forms etc. Bootstrap do it all for you in a single file bootstrap.css. But, here you need to be aware of the different class of css, you can use in particular condition, say different css for layout or Navigation etc. They are quite simple to figure it out from bootstrap online documentation. Bootstrap also provides a no of  plugin written with jquery to work seamlessly, with its css and without much work.

Let me first list the url where you can find different bootstrap resources :

=> List of all opensource projects of twitter hosted on github

http://twitter.github.com/

=> Download Page

You can download bootstrap from below link. It have download bootstrap and download bootstrap source. You will just need bootstrap css and js file for your application, but I suggest you to download it with the source as it will also contain examples and demo along with the required js and css files. If you downlaod with source the js and css file will be available in /doc/assets/js and /doc/assets/css folder respectively.

http://getbootstrap.com/getting-started/

The, bootstrap downloaded from here, will contain everything offered by bootstrap, But say you need only tooltip and popover plugin and do not want a huge bootstrap.min.js or bootstrap.js (both file are same, but first one is minified so, it is of smaller size) to be render. In such case you can customize the js and css file before downloading at below link,

http://getbootstrap.com/customize/

Here, you can also see the css variables, which show you the default settings like @bodyBackground, @linkcolor etc. Well, the bodycolour by default set to white. You want to set it to orange. Strange, you can’t customize these variables here. Don’t worry we will do it later on by writing custom css to override bootstrap default css. personally, I never customize bootstrap from above link, but download the original source and later on do customization in code whenever needed.

NOTE :  If you have downloaded the bootstrap with source, in docs/assets/js folder you will find js files of individual components, like tooltip, popover etc. The individual css component are present in less folder of downloaded source. So, If you are more concerned about load time of your page, keep adding the required component as need arises, instead of including bootstrap.min.js or bootstrap.min.css file itself. But the component js file or the css files in less folder  is not minified, better minified it before including as it will reduce the file size considerably. online tools is available there for minification of js and css files.

=> classes used in creating Layouts

Layout can be classified into two categories : fixed and fluid. The fixed layout is static and measure width, height etc in terms of pixle, while fluid layout measure in terms of percent. Fluid layout adept itself to different screen size. I always prefer fluid layout. Sample code for layout design is available here.

http://getbootstrap.com/getting-started/#examples

You can see that, You can create a layout with few classes. Those classes are as below

Fixed Layout classes -> container, row, span2 span6 etc, offset2 offset4 etc

Fluid Layout classes -> container-fluid, row-fluid, span2 span6 etc, offset2 offset4 etc

=> classes used in creating different component

Now, your layout is ready and you want to create other components like navbar, footer, sidebar etc. But, what class I should use. Well the sample code of every component and its classes is available at the below link

http://getbootstrap.com/components/

=> Basic classes, images and icons

Now, you want to beautify the content of your site. You can find detail of classes related to links, text, list, images etc at the below link

http://getbootstrap.com/components/#glyphicons

NOTE :  Bookmark, these links or just http://getbootstrap.com/components , above are just different tabs of this site.

So, now I assume that, You have your bootstrap’s css and js file to design your whole site and You know about different classes you may need to build it or atleast you know the place from where you can figure out the things which fullfill your need. Great…we will now apply these things to our rails project. Lets call it bootstrap_demo.

$ rails new bootstrap_demo

$ cd bootstrap_demo/

$ rails generate controller bootstrap_demos index

$ rails s

load index page in browser at http://localhost:3000/bootstrap_demos . You will get routes not found error. well add the routes as below in /config/routes.rb file

resources :bootstrap_demos

Reload the Page…. Well You get simple page with message BootstrapDemos#index. Fine, Let us now decide on layout of our site. So this is the spec.

-> Navigation at the top and Footer at bottom

-> Body have two column. Left column for side bar navigation and right column for main content

-> Main content layout will varies for each page.

Top two requirement is consistent through out the site. Let us Put this layout in application.html.erb file. This html file will look like this.

application.html.erb

Now reload the page http://localhost:3000/bootstrap_demos

No css reflected, page look colorless and without any style. It is expected as we have not yet added bootstrap css to our application. copy the bootstrap.min.js or bootstrap.css file from your downloaded folder(present in bootstrap/css folder if downloaded compiled version and in doc/assets/css if downloaded with source code) to the app/assets/javascript and app/assets/stylesheet folder of your application. Now rails3 will automatically load this file. If you are working in some other framework or if bootstrap file is not loaded, you need to link it explicitly in the <head> tag as you may be doing it for other files  as below

<link href=”css/bootstrap.min.css” rel=”stylesheet”>  assuming the path is css/bootstrap.min.css relative to the html file

Let us assume that the bootstrap.min.js file is linked properly in head. So refresh the page again….and here you can see all the css reflected with the page looking as below.

index1

So, you can see that, we have our layout structured through application.html.erb file with top navigation bar, two column for content, and three column footer. Here, you should note that, use and nesting of container-fluid, row-fluid, span4 span12 etc and offset class. You can nest them within one other to make as many block as you wish.

container-fluid  -> It will define the container or box for you. You can create a single container for whole application or multiple box. I have use three container-fluid, one for top nav, one for body content and one for footer

row-fluid  -> It will define no of racks or row in your box, each roe occupy the whole space of the container, within which it is placed.

span4 -> It define, blocks within a row. span4 means, the div with this class will occupy 4 part of the row, a row-fluid consist of 12 part.

span8 -> it means the div with this class will occupy 8/12 of whole width of row-fluid

offset1 -> offset define gap between two blocks, see it use in footer

NOTE:

-> In any row the sum of number used against span and offset should not increase 12
-> The well class, I have used in application.html.erb has nothing to do with layout, it just make a DIV to rise with light background colour. I have used it to make the blocks we have created get visible to you as we do not have any real content there. Use, it if you want your div to rise
So, our layout is ready, Let us add custom content to our index page of bootstrap_demo controller. index.html.erb will look like this

content
Refresh the page and Now it will look like this, with two new column created for the main content one for article and the other for image

index file with content

Wao…we have achieved so much without writing single line of css. What about bootstrap jquery plugin. Let us try tool-tip plugin form bootstrap. This will show some tip about the link when user hover over it

NOTE : bootstrap plugin is build over jquery, So You must include jquery.js also when including bootstrap.js.

copy the jquery.js and bootstrap.js from the downloaded bootstrap to your app/assets/javascript folder. Now modify, your index.html.erb as below. bootstrap documentation on its implementation is available here

index file with js code

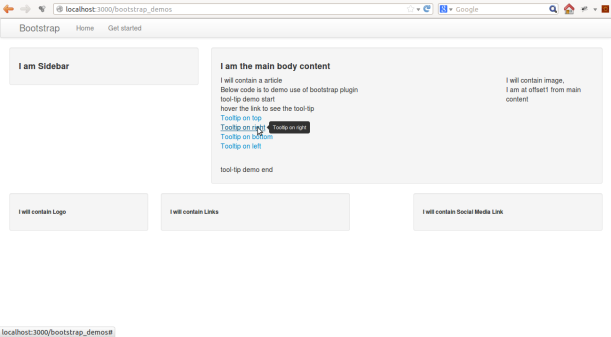
Now refresh the Page. It will look like this, and when you hover over a link it will show the tip about that link

bootstrap tool-tip demo

APPLYING THEMES :

The bootstrap we have downloaded comes with default themes i,e background colour, link colour etc. We can customize them as per our need. But what if, something suits our need without customization or we need to customize on smaller extent. Well bootswatch provides a no of themes for bootstrap. List of all the themes is available here . Download the themes you liked and just replace the bootstrap.css file in your application with the bootstrap.css available in the downloaded theme. say , I downloaded, bootstrap.min.css for amelia and replaced the existing bootstrap.min.css in my app/assets/stylesheet folder with it. Refresh the page….wao now the site looking much colourful.

amelie theme

CUSTOMIZING BOOTSTRAP CSS

coming soon……

for time being refer it at below link to get some idea

http://stackoverflow.com/questions/10451317/twitter-bootstrap-customization-best-practices

References:
http://bootstrapthemes.quora.com/25-Awseome-Twitter-Bootstrap-Themes-For-Better-Bootstrap-Designs   # contain free demo templates

http://www.sitepoint.com/beyond-bootstrap-foundation-frameworks-never-heard/ # alternative framework to bootstrap


Leave a comment

asset not precompiled in rails 3

Asset Pipeline is introduced as core feature of rails with rails 3.1 . The asset pipeline provides a framework to concatenate and minify or compress JavaScript and CSS assets. It also adds the ability to write these assets in other languages such as CoffeeScript, Sass and ERB.

Prior to Rails 3.1 these features were added through third-party Ruby libraries such as Jammit and Sprockets. Rails 3.1 is integrated with Sprockets through Action Pack which depends on the sprockets gem, by default.

Since, asset precompilation is now core feature of rails, the asset pipeline is active by default for Development Environment. Any files within app/assets folder will be precompiled by the asset pipeline. You can turn it off by adding below line to your configuration file for production, staging, development or whatever it is.

config.assets.enabled = false # By default it is true for Development Environment and false for other
This will turn off asset pipeline, so now your assets is not precompiled. But somehow, your rails application is configured to work with compiled assets only, so throwing this error. So , the solution is to remove above line from your configuration file or precompile the assets yourself
SOLUTIONS 1: Not recommended
enable the asset pipeline for the environment causing the problem, say in production.rb make it .
config.assets.enabled = true
This is not recommended in production. Some discussion available here on stackoverflow. In short, if you set it true in production, this will happen when say image1.png is requested by browser first time, the request will be passed to  Sprockets which will compiled and cached in whatever Rails is using for cache (usually the filesystem) and served back.On subsequent requests Sprockets receives the request and has to look up the fingerprinted filename, check that the file (image) or files(css and js) that make up the asset were not modified, and then if there is a cached version serve that. doing all this involve a lot of overhead and will slow down your application
SOLUTION 2: Manually Precompiling the assetsThis is recommended solution for Production. When assets are precompiled and compile is off, assets are compiled and fingerprinted to the public/assets. Sprockets returns a mapping table of the plain to fingerprinted filenames to Rails, and Rails writes this to the filesystem. The manifests.yml file is loaded into Memory by Rails at startup and cached for use by the asset helper methods.This makes the generation of pages with correct fingerprinted assets very fast, and the serving of the files themselves are web-server-from-the-filesystem fast. Both dramatically faster than live compiling.Set following configuration in production.rb environment file.

config.assets.enabled = false # live compilation is disabled
config.assets.digest = true # The asset will be compiled with fingerprinting, this is must as Sprockets look to fingerprint to check file is changed or not
config.assets.compress = true # will compress css and js file
config.assets.precompile += %w( search.js ) # search.js is say manifest file i,e it include list of other file...do not use this line if you do not have any left out manifest, search.js in my case. I have just mentioned it here as a example to precompile asset put in manifest different from the default one i,e application.css, application.js. All file you have included in application.css and application.js will be precompiled by default. If something included in other file, say search.js , it can be included as here.
Now Login to your production server and compile the asset manually with below command.

bundle exec rake assets:precompile RAILS_ENV=production

If you do not have write access to your production file system, you can call this task locally and then deploy the compiled assets.

bundle exec rake assets:precompile RAILS_ENV=development

Compiled assets are written to the location specified in config.assets.prefix. By default, this is the public/assets directory.Also note that, a no of default for asset pipeline work only for production. for example , Fingerprinting is enabled by default for production and disabled for all other environments. You must enable it in development.rb file as below, if you want to precompile the assets on development machine and then deploy the compiled assets  to production
config.assets.digest = true # if you precompile your asset directly in environment other then production, by above command you need to set this option to true, otherwise, you will again get the error asset not precompiled